While installing Max Access is a straightforward and easy process no matter what type of website you have, the specific steps can vary depending on which web hosting platform you use. We offer two types of instructions to help users get Max Access up and running on their websites:
- General step-by-step instructions, and
- Platform-specific instructions (platform options listed at the bottom of general instructions)
For WordPress users in particular, though, there’s an even faster way to get Max Access up and running on your site: install the Accessibility Toolbar plugin.
Simply install it, add your license key, and then enable the plugin itself. By using the plugin, you won’t have to worry about copying an installation script and figuring out where to place it!
Getting Started
Setting up Max Access for WordPress can be broken down into two main steps:
- Installing the Accessibility Toolbar Plugin from the Plugin Directory on WordPress, and
- Finding your License Key by logging into your Ability account
Below are brief explanations of both steps.
Installing the Accessibility Toolbar Plugin
To get Max Access for WordPress, you should:
- Select the Plugins tab from the options listed on the left side of your WordPress admin dashboard. Then, select Add New Plugins from the sub menu.
- Do a keyword search on the Add Plugins page for the words “accessibility toolbar.” The Accessibility Toolbar will appear in the search results.
- Click the Install Now/Activate button.
Finding Your License Key
The other main step you’ll need to take in order to install Max Access for WordPress is to input your license key in the Accessibility Toolbar plugin info. But first, you’ll need to find where your license key is so you can copy it.
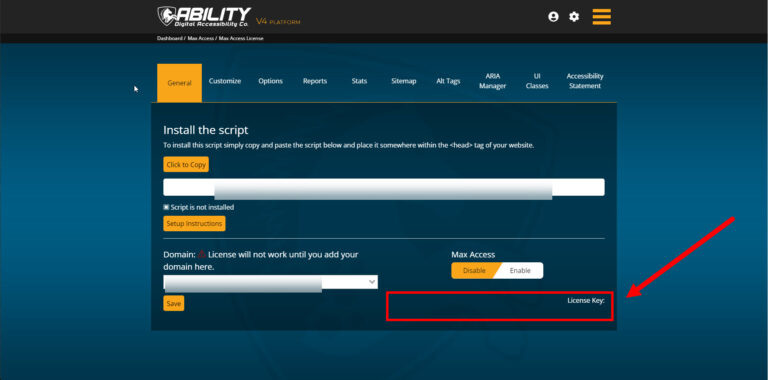
When you initially signed up for Max Access, you should have created an account with us. Your Max Access license key will be in your Ability account.
To find your license key, you should:
- Login to your Ability account.
- Select your Domain Name/License under the Max Access tab.
- Copy your license key that is on the bottom right side of the General tab.
- Input your license key into the Accessibility Toolbar info in WordPress.
- Click the Submit button.
After you activate the plugin, Max Access will immediately start scanning and remediating accessibility issues on your website — and that means you’ll be offering your site visitors a more accessible experience as fast as possible.
Want a Detailed Walkthrough?
For more detailed instructions on how to install the Accessibility Toolbar plugin to your WordPress website, check out our WordPress Setup Instructions.
Not a Max Access user yet? Sign up for a free account here.

